Great to have you back for another tutorial by Turtleshell Software! This article is a Visual Studio Intro for beginners where we will provide a walk-through guide relevant to beginners as well as some handy tips to make your life as a programmer simpler.
This article can go hand in hand with the previous article “Welcome to C#” as well as complement any other Visual Studio/ C# tutorials you may have already complete.
Visual Studio is an Integrated Development Environment (IDE) produced by Microsoft. In other words, it’s a fancy pants place you write and run your code, given to us by Bill Gates. The reasons I prefer to write any C# code by using Visual Studio are:
As a side note, Visual Studio also accommodates for Mac users. This tutorial and probably any of my other tutorials are based on the assumption you are using the Windows operating system, there may be some slight variation of anything explained depending on your operating system.
If you have completed my previous tutorial or you already understand the download and installation process, please skip through to the “Create a Project” section.
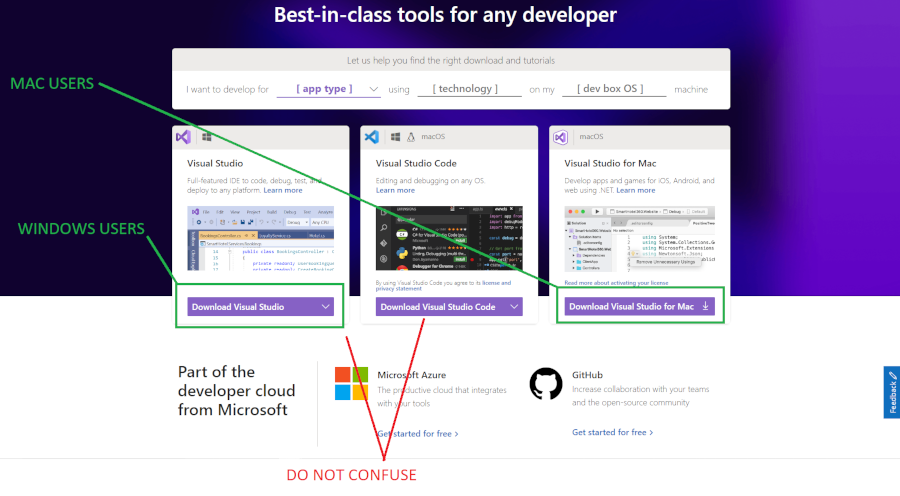
To download, simply go to https://visualstudio.microsoft.com/ and either “Download Visual Studio” then select “Community 2019” (the most current version of Visual Studio at the time of writing this article) or for Mac users, select “Download Visual Studio for Mac”. Do not get Visual Studio and Visual Studio Code confused with one another. Visual Studio Code is fantastic but it is a text editor/ code editor not an IDE and it will not allow you the same features as Visual Studio.
Run the installation file and follow the prompts to install to your desired location.
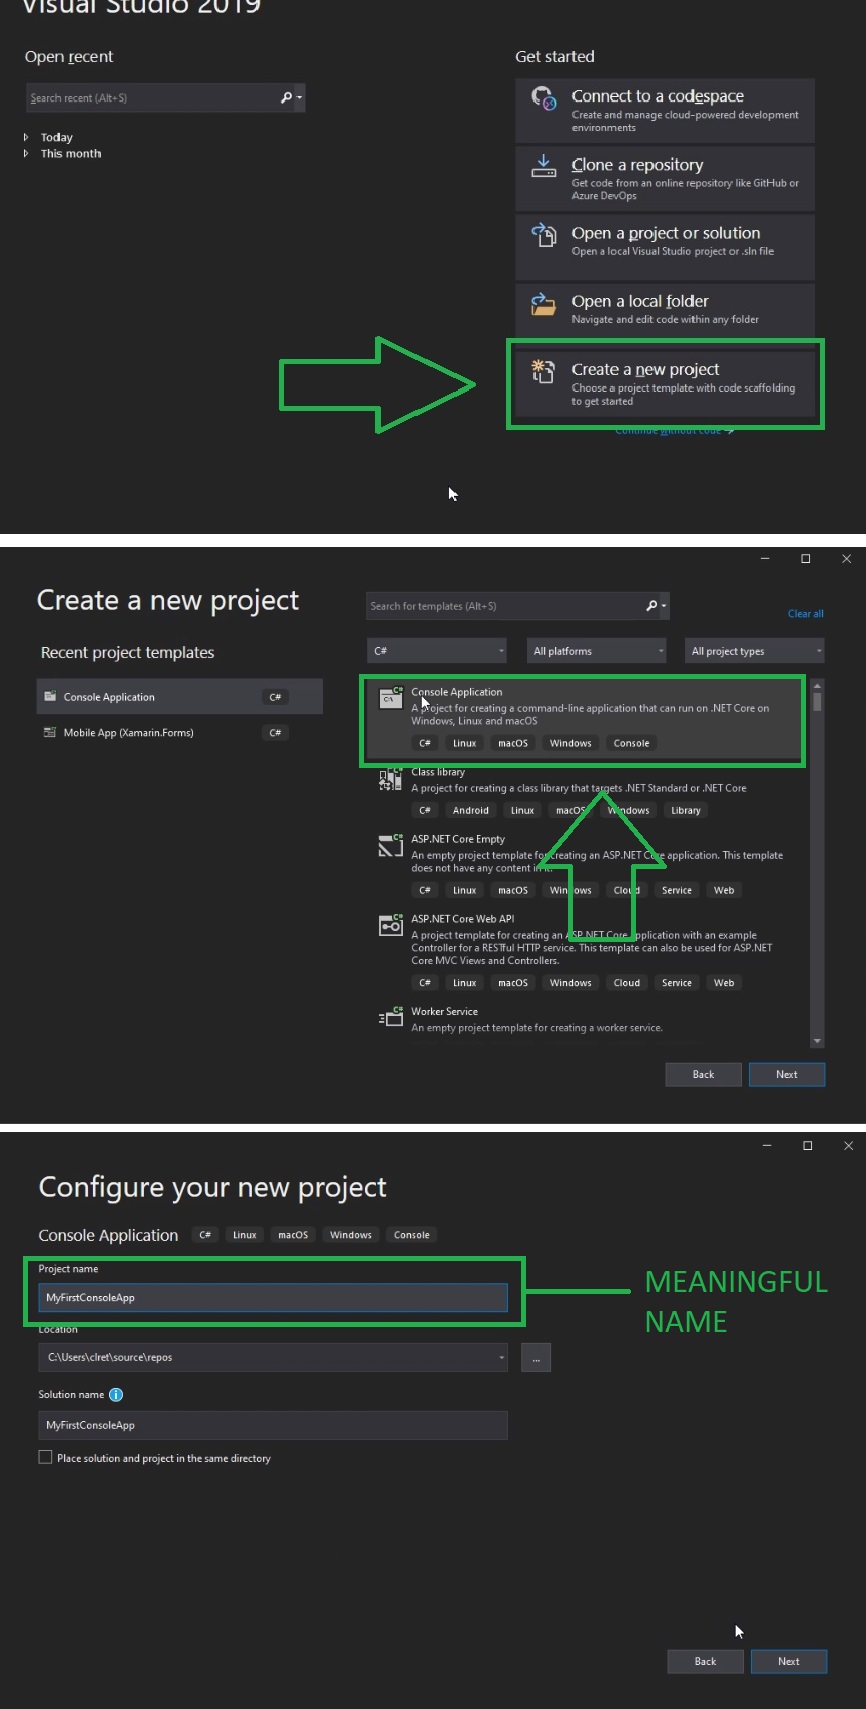
Now that you have downloaded and installed Visual Studio it’s time to create a project. For the purpose of this demonstration, I will be creating a new Console Application and naming it “VisualStudioIntro” as shown in the image below.
After Visual Studio has finished generating your new project you will be able to see three windows in your development environment.
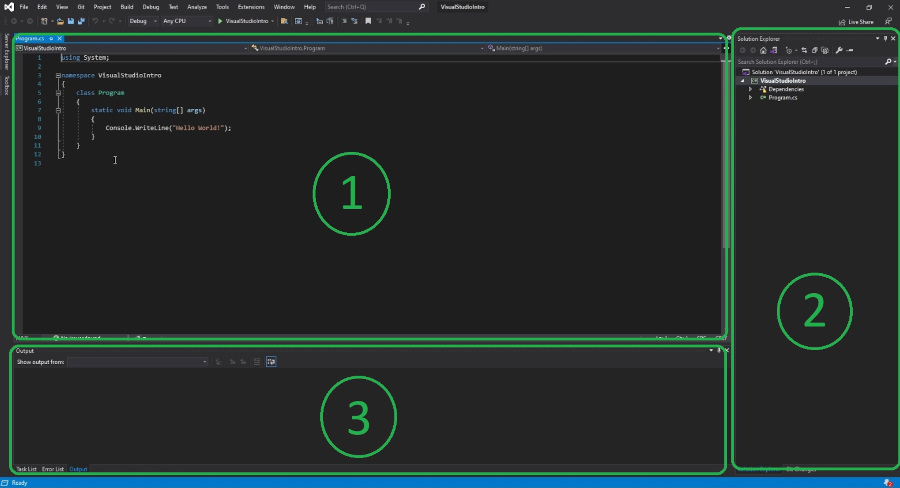
The most dominant window is the “Code Editor” window. This is the area where you write and debug your code.
The second window you can see is the “Solution Explorer”. This lists your solution and any projects that it includes. Solutions can contain multiple projects but as a beginner you will probably just start with one.
You can think of a project as a file structure – it’s just a collection of folders and files just like you would see on your C drive or any other. If you want to add additional folders/ files, you can right click on the project (or desired location), hover over “Add” and choose from a selection of options such as “New Folder” or “New Item”.
The window at the bottom is the “Output” window and it will display any messages you have programmed to display outputs such as “Console.WriteLine();” or “Debug.WriteLine();”. This can sometimes be helpful in debugging your code and monitoring that your program is behaving as desired.
Another window worth mentioning is the “Error List” window that can be accessed by clicking the tab at the bottom of the Output window. This will show a list of errors and warnings. It usually lets you know if there is a significant problem when trying to compile and run your project.
NOTE: This is just the default layout for Visual Studio. Visual Studio is fully customisable depending on your personal preferences, so have a play around and see what works for you. You are even able to change up the colours if you like.
Shortcuts paired with state of the art IntelliSense makes Visual Studio one of the most efficient IDE’s. For your convenience, I have provided a short list of keys and combinations to make a beginners life much easier. Be sure to watch the Visual Studio Beginner Intro tutorial for a demonstration.
| Function | Shortcut/ Combination |
|---|---|
| Save file | Ctrl + s |
| Save all files | Ctrl + Shift + s |
| Go to start of line | Home |
| Go to end of line | End |
| Line navigation | Arrow keys |
| Fast line navigation | Ctrl + arrow key |
| Save file | Ctrl + s |
| Copy | Ctrl + c |
| Cut | Ctrl + x |
| Paste | Ctrl + v |
| Undo | Ctrl + z |
| Redo | Ctrl + y |
| Duplicate | Ctrl + d |
| Comment | Ctrl + k + c |
| Uncomment | Ctrl + k + u |
| Run program | F5 |
| Stop program | Ctrl + F5 |
| Quick “Console.WriteLine();” | Type “cw” then “tab” “tab” |
| Quick “If” statement | Type “if” then “tab” “tab” |
| Quick “For” loop | Type “for” then “tab” “tab” |
| Quick “Foreach” statement | Type “foreach” then “tab” “tab” |
| Quick “Getter”/ “Setter” property | Type “prop” then “tab” “tab” |
| Wrap code in a block | Highlight code then press Ctrl + k + s and select option. |
If you have any other Visual Studio tips, tricks, shortcuts or just interesting information, feel free to let us know in a comment.
Thanks for reading. Have a good day and keep programming! :]
