Hi and welcome to the very first programming article on the new Turtleshell Software website.
I wanted to tell everyone about C#, what it can be used for and provide a small introductory tutorial. I have uploaded a video for your convenience.

C# is a great language for beginners as it has a huge user base and therefore a massive community to support it. It can be a lot easier to debug a problem or get support from a large community because the chances are, someone else has also experienced the same or similar problem.
Programmers who have come from a background in any C based language will be able to recognise many similarities in C# as (you guessed it) it’s also a C based language. It has been developed by Microsoft to create applications using the .NET framework such as:
Game development is another field that utilises C# programming. A popular tool is the Unity game engine that you can download and use for free. This is where I got my first taste of C# and is a great place to start especially for those of you who might enjoy the more visual aspect of the result of your code.
In this section, we will cover some very basic fundamentals of C# programming in a console application.
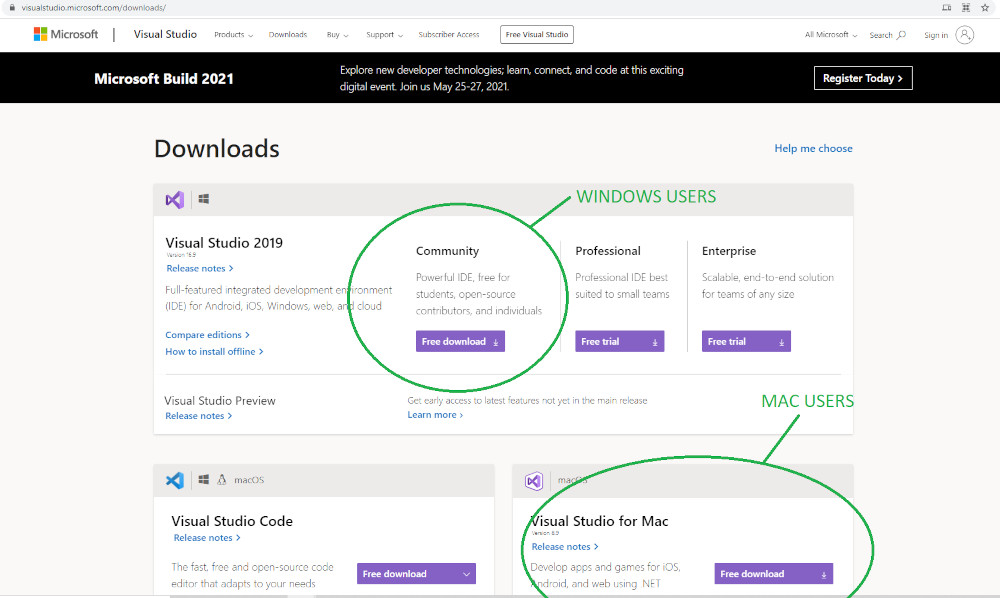
Go to Microsoft’s Visual Studio web site and download and install the most recent version of Visual Studio. For this example we will be using Visual Studio 2019 Community edition, any other version may have some setup variations. Please make sure not to get confused with Visual Studio Code, as this is a code editor and not an IDE (Integrated Development Environment).

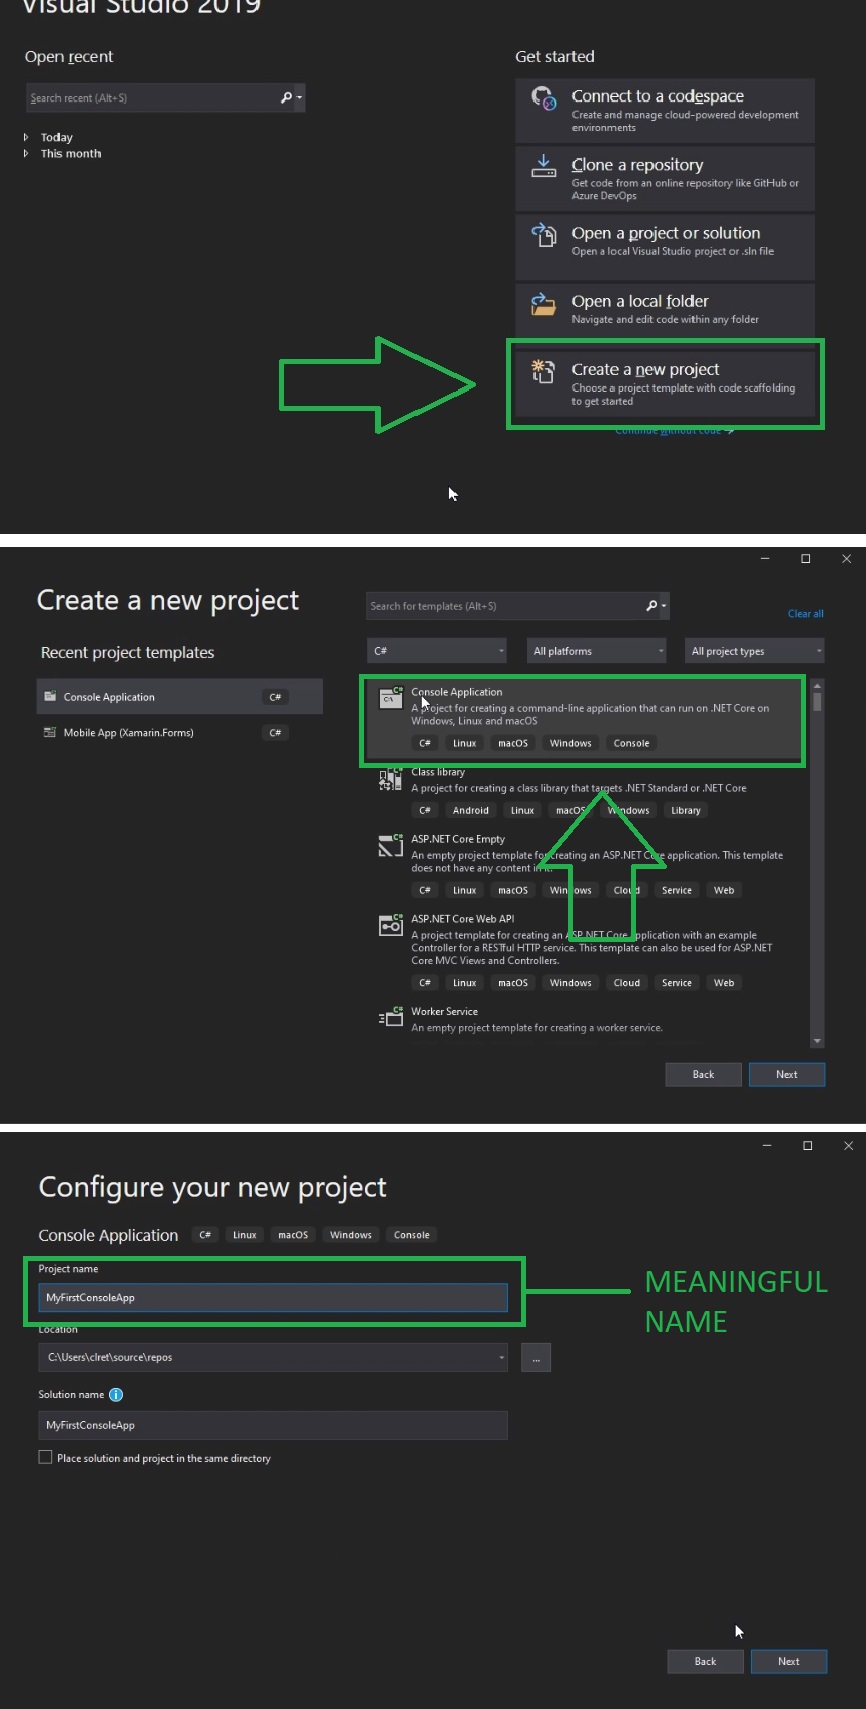
After installation and setup, open Visual Studio and select “Create a new project”. Then select “Console Application” and click “Next”. The next screen is where you can give your project a name. I highly recommend getting into the habit of giving any project a non-generic name, even if it is just a practice application or you are messing about. Good programming starts with descriptive naming, even if it’s as basic as “MyFirstConsoleApp”. At this point, you may like to save the project to a specific location. For me, I will leave it at the default location and continue.

The following screen will allow you to select the version of the .Net framework to use. We will select 5.0 because it is the most recent up to date version at the time of this article.
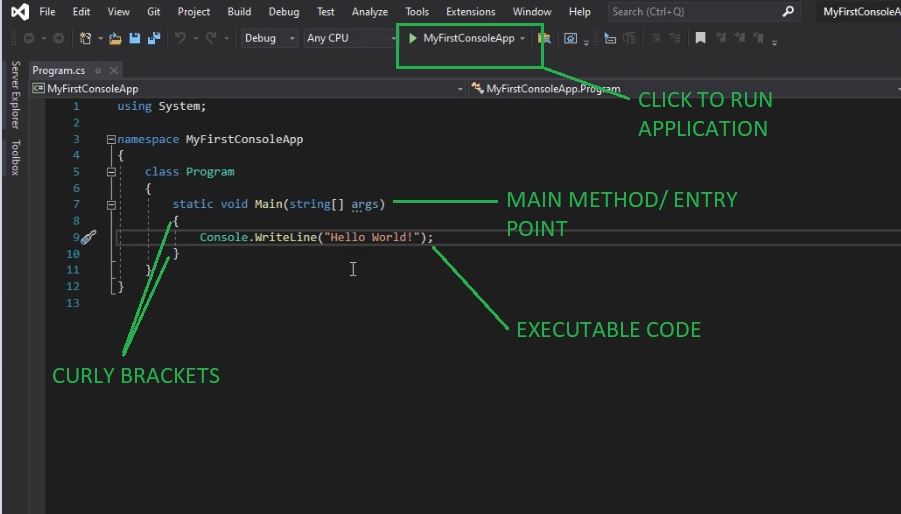
You can see that the project already gives you enough code for a runnable application (as bland as it may be). Most of it may look a little foreign if you are just starting out, but the main part we are interested in for this tutorial is the block called “static void Main”. This method is known as our “entry point” and anything that we write between the curly brackets { } will be executed (or run) in the program, for example: Console.WriteLine(“Hello World!”); This is simply a function that will print “Hello World!” to our console.

Go ahead and test the application by either pressing the green arrow near the top of the screen or by pressing the F5 key. I recommend getting used to as many shortcut keys as you can when you find you are doing something repetitively, this will greatly increases your productivity. You should see the console appear, and on the first line it will say “Hello World!”. Press any key to end the program.
If you hover your mouse over the words “Hello World!”, Visual Studio will tell you that the value of “Hello World!” is of type “string”. We want to capture that value into what is called a “variable” so we can call the variable at any time we desire. To do this we first declare what type of variable it is, in this case it is “string”, followed by the name we are giving to the variable. It’s very important to provide a descriptive name, written in “camel case”, in this instance we will call it “greeting”. Then we assign the value to the variable and close the line off by using a semi-colon ; Note that the equals = sign in this instance represents assignment of a value and not a measure of equality.
We will now replace Console.WriteLine(“Hello World!”); with Console.WriteLine(greeting); and run the application. You should see the exact same output as the first time you run the program.
					using System;

namespace MyFirstConsoleApp
{
    class Program
    {
        static void Main(string[] args)
        {
            string greeting = "Hello World!";

            Console.WriteLine(greeting);
        }
    }
}
Now we will add interactivity through user input. Our process will be to ask for the users name and then output a generic greeting including the users name that they have entered. Start by changing “Hello World!” to “Hello ” (note the space at the end). Then create a new variable and call it “name” with an empty string as a value (“”).
In our Console.WriteLine() method we will now ask the user for their name. The following line will re assign a value to name via the user input. The new method is called “Console.ReadLine()”.
The final step will be to add one more output to the console that combines both of our string values together. This is called string “concatenation” and can be done in a couple of different ways, the easiest being add a plus symbol between the two strings.
					using System;

namespace MyFirstConsoleApp
{
    class Program
    {
        static void Main(string[] args)
        {
            string greeting = "Hello ";
            string name = "";

            Console.WriteLine("Please enter your name...");
            name = Console.ReadLine();
            Console.WriteLine(greeting + name);
        }
    }
}
Your output should look something like this:
					Please enter your name...
Cam
Hello Cam
Now that you have some idea of user input and console outputs, you may like to create a program to complete some simple mathematical equations. There are several different variable types for storing numbers and decimals that you can read about from the Microsoft documentation but in our example we have used “int” (short for “integer”).
Our example requests a first number and stores the value in an “int” variable called “firstNumber” (note the camel case used in the name – capitalization on the first letter of any words after the first. No spaces between words). It then does the same for a second number and adds the two numbers together in the result output line.
You may notice the “Convert.ToInt32” functions used. These are necessary because the Console.ReadLine functions return a string variable. In order for them to be able to function effectively as numbers rather than “string” values, they have to be converted to a numeric variable such as “int”.
					using System;

namespace MyFirstConsoleApp
{
    class Program
    {
        static void Main(string[] args)
        {
            int firstNumber = 0;
            int secondNumber = 0;

            Console.WriteLine("Enter first number...");
            firstNumber = Convert.ToInt32(Console.ReadLine());

            Console.WriteLine("Enter second number...");
            secondNumber = Convert.ToInt32(Console.ReadLine());

            Console.WriteLine("Result " + (firstNumber + secondNumber));
        }
    }
}
If you want to try subtraction, multiplication or division, you can simply replace the “+” symbol between firstNumber and secondNumber. Keep in mind that if you ever try to divide any number by 0 in C#, an exception will be thrown and the program will crash.
If you have learnt something today, please share this article around. We are looking to dive into further C# fundamentals and programming concepts in the near future. If you have anything interesting to contribute or have a tutorial request, let us know in a comment.
Keep learning and have a great day!